Wednesday, 17 August 2016

Completed Cuban Army for my Ten Years War in Cuba Project


General view of the three units that make up my early war Cuban Army. Units of liberated slaves are on either flank with Cespedes -leader of the rebellion - and a small group of plantation owners armed with miscellaneous weapons in the centre.

 
Above are two more views of the same early war units with the original Cuban flag. I believe that the genuine article from 1868 is now in the Museum of Havana.
 

Shown here are later war units of infantry and a mountain gun which can be added to the other units to strengthen them. Below are two more views which also show the final version of the Cuban flag and the one in use today:


Cuban cavalry deployed in line and preparing for their famous machete charge.
 
 
Two general views of my Cuban cavalry units:
 
 
The current state of my completed Cuban Army is:
3 Regiments of infantry for the early years of the war (9 plantation owners, two units each of 10 liberated slaves)
1 Regiment of 17 troops for the later years of the war
2 Regiments each of 6 cavalry
1 Mountain gun and crew.
 
I plan to add another regiment of six cavalry and the Cubans will also be able to call upon the gunrunning ship Anna and her crew when the models are finished!


Completed Spanish Army for my Ten Years War in Cuba Project


The whole of my Spanish Infantry Brigade; four regiments and the Brigade Command.


Above and below are two clearer shots so that you can see the four units making up my brigade.


Spanish cavalry and artillery with transport in the form of an ox cart in the background.


A couple more views of the Lancer regiment, ox drawn cart, gun, crew and limber.
 
 
I am planning to add another infantry regiment - a unit of guards - and a couple of figures to man the cart, but at the moment the strength of my Spanish Army is:
 
4 Regiments of Infantry, each of 12 troops
1 Regiment of Cavalry, 6 lancers
1 Gun and crew of 6
1 Transport cart.


Tuesday, 16 August 2016

Britcon 2016

 I have been getting involved with my local wargames club, the Mailed Fist and visited their demonstration game at Britcon this year. The game was based upon Austerlitz and occupied a huge 16 by 6 foot table with thousands of 15mm figures. Unfortunately I could only attend on the Sunday so I just sat in, observed and listened to the gunfire both on and off the table! I took a few photographs and decided to post them on here.


Two views showing the extreme right wing of the Russian and Austrian forces with their massed artillery on the Pratzen heights in the distance. The French forces are deployed beyond the river on the right of the pictures.


Extreme French left showing units fording the river and advancing to the Austrian positions.


Extreme right of the French line; having crossed the river once they were forced back by Russian units advancing down from the Pratzen heights.


General view of the Russian left showing units advancing towards the French just out of view on the opposite bank of the river on the left.


Action in the centre from behind the French line; Russians and Austrians advancing across the river.


Two more views of action in the French centre. Both sides trading shots across the river from walled fields.


On their extreme right the French managed to cross the river again and begin forcing the Russians back as their own centre and left flank were in danger of collapsing!

At that rather interesting point the game had to be concluded as the final day of Britcon 2016 drew to a close. Everyone agreed that the game had been very enjoyable if not particularly accurate from a historical point of view. The main bone of contention was that the Russian and Austrian forces were allowed to deploy to their own plan which resulted in them massing artillery on the Pratzen Heights. Any French unit that appeared was then promptly obliterated!

There was much discussion on this point; perhaps it would have been better following the actual deployment and using that as a starting off point? Well we shall never know, and as for the Club's plans for next year.....


Cuban Army for the Ten Years War in Cuba

The mainstay of my Cuban army are also figures from the Perry Miniatures American Civil War range, particularly the Confederate infantry. The main problem I had was depicting a very rough and ready force as it appeared at the start of the war, and then a more professional looking body as the war
progressed. Also there were going to be difficulties showing soldiers on one hand and liberated slaves on the other. Clearly my Cuban forces would require more than the simple paint job that provided my Spanish forces.


Three of my Mambi soldiers with the Cuban flag as it appeared at the start of the rebellion; they are Perry Miniatures American Civil War Confederates with some simple conversion work.  I sliced off or filed the top of head to get a nice flat surface to which I could glue a disc of paper or plastic card. Then, on the centre of the disc I stuck a new crown in place; this was made from scrap plastic, filler or even by using a trimmed down cap from the box of  Perry stuff. Some of the figures have machetes made from a strip of plastic card. Finally they were undercoated, the hats suitably crushed and then painted up.


I think that it is always difficult to represent irregular forces but I am quite pleased with the result I have achieved here. Some of them are armed only with machetes or swords, a couple have pistols, one has a rifle, one has a rifle chopped down to represent a shotgun and the standard bearer has a double barrelled shotgun slung across his back.


Two more Mambi soldiers. The one on the left is a conversion from a Perry  figure  as described, the one on the right is a presentation figure given when you buy the ACW rules supplement from Warlord Games.


Another Mambi soldier in close up. The insignia on the hat is the Cuban flag that was eventually adopted and is still used today.  I found a suitable image on the internet, copied it into a graphics programme, reduced it, repeated it many times and then printed out a whole sheet of them.


I had quite a search to find figures that  I could use for  liberated slaves; I eventually settled on these Copplestone Castings available from North Star. They are Zanzibaris and I was attracted to them since they have bare feet and clear negro features.

My interest in this particular war was first sparked when I saw the painting of a Cuban machete charge that I used at head of my post labelled the Ten Years War. Which of course meant that I had to have Cuban cavalry. Perry Miniatures came to the rescue again with their American Civil War cavalry although they needed a little conversion work. First I removed the scabbard and sword hilt, replacing them with a machete case made from plastic card. Heads were treated the same way as the infantry and provided with a suitable hat.


In the picture on the left you can see the conversion work on an unpainted figure; on the right is the same figure after a coat of primer.


And here the finished regiment, exactly as I envisaged them and ready to charge like those in the painting!


A close up view of one of my Mambi cavalry ready to join in a machete charge against their Spanish adversaries.


Although the Cuban Army was basically an insurgent army they did have some artillery; either smuggled in from the USA, supplied by various juntas and sympathises, or captured from defeated Spanish units. Particularly favoured were mountain guns and I decided to make one to beef up my fledgling force.


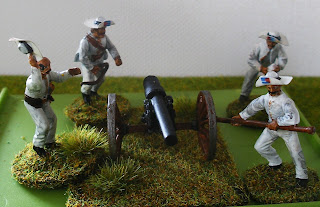
It is made from Perry ACW artillery parts; the trail was built direct from the box, then a section was taken out of the middle and the two pieces glued together thus reducing the overall length of the trail. The barrel was taken straight from the box but was thickened for the last third of its length by winding tape round. The wheels came from my box of 20mm bits as the ones from the Perry set were far too big for this type of gun. The final piece was based and painted before being provided with a crew. You can see above that the commander is delighted at scoring a hit and has thrown his hat into the air!


As mountain guns were generally transported by mules I made a second gun and deconstructed it into several loads to add to the packs on a number of mules.


The mules came from a range of toy animals for zoos and farms; harnesses were made from plastic card and tape. I have a second set of four mules and may eventually get round to modelling them without the gun for times when the gun is in action, but for the moment I am more than pleased with the result.


Wednesday, 10 August 2016

Making Coastline and Beaches

One scenario that I was keen to play in my Ten Years War in Cuba project was that of gun running or a filibustering expedition as it was called at the time. To do this I needed a ship and a coastline or beach. The ship is currently being built and I will post details later when the model is finished. My method od making the coastline however is so quick and easy that I thought I would share it with you right away!

First of all I needed to represent the sea and did this very simply by visiting a fabric shop and buying a couple of meters of suitable pvc or vinyl. I chose a deep blue and lightly textured material and was pleased that it only cost me £6-00:


I know, it's a boring photograph but things begin to get interesting when you lay your gaming mat on top of the sea:


At this stage it doesn't look very realistic with a perfectly straight join between land and sea, however, when I bought the vinyl I also bought an offcut of sand coloured fabric for just £2-00. I laid this out and cut an irregular shaped strip which I then placed over the join between land and sea. Hey Presto! A coastline:


Adding palm trees and rocky outcrops using chunks of cork bark soon brought it to life:


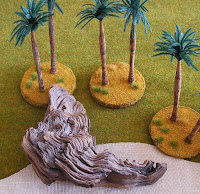
As well as using cork bark I also use Mopani wood which is another good method of representing rocks:


If you have not heard of Mopani wood before you can obtain it from pet shops and from suppliers of accessories for fish tanks and reptile tanks. Here is a close up to give you a better idea of the texture:


I added some of my stands of jungle to break up the rather harsh lines and add interest:
 
 
And that's it! I hope you like the idea which really is a quick, simple and cheap method of introducing coastline into your wargames. The idea can easily be adapted to make a wide river, lake, estuary or even a desert island and, although I made this for my Ten Years War in Cuba game, it can easily be used for any other period and any other theatre of war. As soon as my Cuban and Spanish armies are complete and when the gun runner's ship is built I'll feature the scenario on here so that you can see the whole thing.