Thursday, 12 November 2020

 Building the Sarissa Colonial Steam Launch


The basic kit completed. I added a couple of ribs and drilled them ready to take the rigging. I also replaced the square funnel with a much better looking hollow tube. 

I added a few extra ribs along the sides and also made a sack of coal from masking tape and gravel.


New mast made from dowelling replaced the square sectioned one that came with the kit.


Basic paint job on the completed model.


Rigging and canopy added.


Coil of rope put into place and sack of coal painted up.

Selection of views showing the completed launch delivering supplies:


Monday, 9 March 2020

Making an Archaeological Dig for my Sudan Wargame


 When I decided to use my diminutive British colonial army and a horde of dervishes for a Black Powder skirmish I was at a loss for a different and unusual scenario that I could use. I didn’t want to play just another colonial game in the Sudan and inspiration struck when I watched a televised documentary about the Rosetta Stone. The chequered history of the stone as it was discovered, captured and taken away suggested to me the unusual idea of using an archaeological dig as the centerpiece of a small encounter and I set to work. The idea of including in a wargame an area that actually went “under ground level” intrigued me and once I had cracked the problem it certainly produced a unique-looking example of terrain. So, how did I do it?


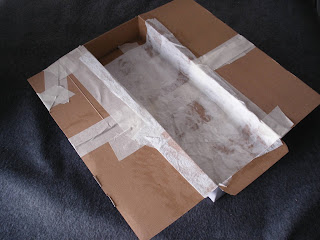
My table is six foot by four foot in size, but it is actually made up from two tables each of which is six foot by two foot. By setting these two tables apart slightly - about six inches apart - I was able to slot between them a box six inches by eighteen inches in size. The box was extended on the longer edges to give a flap which rested on the table top and supported it in place; the remaining six-inch gaps on either side of the box were then covered with cardboard sheets before the whole surface was given a desert makeover with a suitable cloth, reindeer moss, sand and so on. 


The basic box construction with flaps to either side


The actual dig was constructed inside this box and was textured with tissue that had been soaked in p v a and sprinkled with sand before being painted a suitable desert sand colour. I decided to alter one end of the box by making it higher so that the “dig” appeared to go under a rise in the ground. This was done easily enough by adding a chunk of florists’ oasis and fixing it in place with tissue and p v a again; if you prefer you could use polystyrene or indeed any other material that takes your fancy as it will eventually be covered and painted to blend in with the rest of the terrain.


Checking everything for size and look before contuning with the build


Adding blocks of oasis to make the rocky outcrop


Rocky outcrop completed and the whole build covered with tissue and pva


Flight of steps built from card and covered with tissue and pva


Completed dig  covered with sand and painted

The lotus-shaped pillars are actually small glass or acrylic bottles from the Airwick Pure air freshener range. To give them a little texture they were sheathed in a net thread cover for sewing spools; this is a fine white mesh which is elasticated and can easily be sourced on eBay. If you cannot find this product then a useful alternative can be found in the fine, plastic mesh bags used to package onions and some other vegetables and fruit. When the mesh was fixed in place I seated the whole thing in a section of cardboard tube and tidied up the exposed lower edge of the mesh by wrapping and gluing thick thread in place. Finally, I added a strip of serrated paper to the top; this was actually “made” by ripping a sheet of paper from my sketch pad and then cutting and straightening the torn edge – a technique that I have used many times. When all of the adhesive had dried I spray painted the two pillars and added dry-brushed weathering. A last touch was to fix in place a thin strip of coloured paper that I copied from Egyptian motifs found on the internet and then printed off.


Raw materials for making the lotus shaped pillars 


The completed lotus shaped pillars 

Thelintel placed across these two lotus pillars was simply a piece of expanded polystyrene; it had been wrapped in kitchen roll and sealed with p v a glue again before being painted. It was then enhanced with another strip of serrated-edged paper and a last piece of the Egyptian motif that I had already used on the pillars. The stairway was easily made from strips of card glued together and then given the p v a and tissue paper treatment to give them texture and seal them. The rock faces leading down into the tomb are just chunks of cork bark but you could use pieces of bogwood, or polystyrene slabs suitably textured and painted.


All of the components textured and painted


Everything brought together! 

I decided to try and use lighting in a couple of the photographs that I planned; in order to do this a couple of holes were made in the box and l e d bulbs from a short string were threaded through. The final detailing of the whole thing came with the addition of a couple of Egyptian statues from Ainsty Castings and various pots and jugs from Iron Gate Scenery. 


Final effect with lights and archaeologists!

The dig is set within the confines of a small settlement of four scratch built buildings with a well and a couple of stands of palm trees. The British encampment consists of bell tents from the Perry range and a zariba made from twigs suitably based and flocked. Other scenic elements are reindeer moss along with chunks of cork bark and bogwood as already mentioned and a scenic backdrop. The backdrop was made by printing off a suitable picture from the internet, enlarging it on a photocopier, making multiple copies - some of which were mirror images - and joining them together.


Tuesday, 28 January 2020

Published Work

Published Work

I have not done a great deal on my blog recently as I have been busy writing and have had some success in getting my work published. In each of the articles listed here I have made and painted the models, written the article and taken the photographs! My work so far includes the following:

"Machete! Wargaming the Ten Years' War in Cuba 1868-1878." Wargames Illustrated, issue 372, October 2018.

"Cobrar Mambises! An engagement in the Ten Years' War in 19th century Cuba." Miniature Wargames, issue 431, March 2019.

"Anarchy in the U.K. The Siege of Sidney Street and similar events." Miniature Wargames, issue 444, April 2020.

"Puerto Principe. Building a Caribbean harbour and fort for Black Seas." Wargames Illustrated, issue 391, July 2020.

"Keep Taking the Tablets: Archaeology and Arms in the Anglo-Egyptian Sudan." Miniature Wargames issue number 449, September 2020.

"Building an Irish Round Tower." Wargames Illustrated, issue 1395, November 2020.

"Club Spotlight, Mailed Fist Wargaming Club." Miniature Wargames issue number 450, October 2020. (Although the editor has credited himself with this piece it is entirely my own work!)

"Building Fort Nassau." Wargames Illustrated, issue number 404, August 2021.

"Building a Village of Celtic Round Houses." Forthcoming in Wargames Illustrated.

"Corrugated Camp" Miniature Wargames issue number 464, December 2021.

"On the Rod to Mandalay" Miniature Wargames issue number 473, September 2022.

"Mucking about near Mukden." Wargames Illustrated, issue number 419, November 2022.

"Building an Ancient Egyptian Pylon." Miniature Wargames, issue number 478, January 2023

"Shamrocks and Roses." Miniature Wargames, issue number 484, August 2023.

"Djinns from the Dunes: The SAS and the LRDG Attack an Italian Airfield." Wargames Illustrated, issue number 436, April 2024.

"Papyrus, Pulp, and the Oath of Osiris." Wargames Illustrated, issue number 440, August 2024.

"Death on the Nile." Miniature Wargames, issue number 497, September 2024.

"Bang! Gunpowder and Gaming in the Early Era." Wargames Illustrated, issue number 445, January 2025.